Can I save my reports in Churchteams? How do I later access them?
You can save reports and add dynamic date filters so that it filters properly no matter when you run the report. Add search tags and choose an appropriate Security Level so that the report can be shared with other staff.
There are two options for saving a report -
- Save the Report while still on the report creation screen (shown in the image below, the white button inside the orange Summary box).

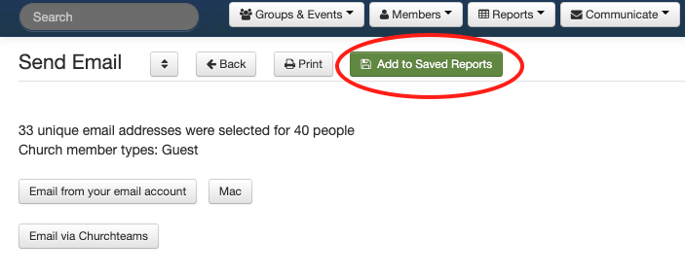
- Save the Report after clicking the Run Report button and advancing to the Report page (see the image below).

In the example above, a Member Listing Report (a data output report), the report is displayed, and the "Add to Saved Reports" button is available at the top of the page.

In the example above, most all reports that perform mass action in the database will prompt you to complete at least one other step before the report or action runs (in this case, the email editor opens), you must click the "Add to Saved Reports" button before completing any further action.
Saving a Report
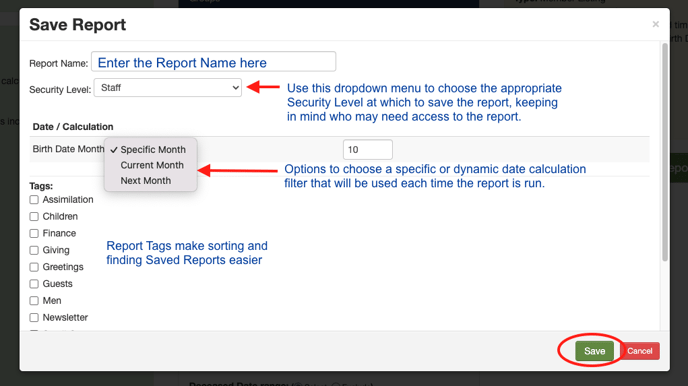
The Save dialogue box includes fields for naming your report, selecting the appropriate Security Level at which the report is saved, adding Tags to easily find Saved Reports, and options for date calculation filters.

Of course, the more filters you include in a report, particularly those that include dates, the more options your Save dialogue box can potentially have.
Accessing Saved Reports
To access reports you have already saved, go to Reports > Saved.

This page lists the Saved Reports in your Churchteams Account.

- Quickly search by the name of a Saved Report.
- Use the dropdown menu to filter the list of Saved Reports by only certain Tags you select.
- Filter the list of Saved Reports to see either all reports or only those created by you.
- Click on any column heading to sort the list by that particular heading.
- Click the tag icon to edit or add additional tags to a Saved Report.
- Click the name of the "created by" person to edit who owns the Saved Report.
- Click the current Security Level to edit.
- Click the trash icon to delete/remove a Saved Report. This deletes the Saved Report in your Churchteams Account, not just from your own personal list.
You can also Create a New Report from this page by clicking the New Report button.
You can also toggle over to Scheduled Reports from this page for quick access.
