
SERVICE VOLUNTEERS HELP ARTICLE

GROUPS SETTINGS
Groups & Events > Settings
Since everything that involves more than one person is managed as a group, how well you organize groups will determine the optimization of Churchteams. When you begin a Churchteams subscription, we provide groups in your account with settings common to most churches, but we encourage you to customize these to best fit your church preferences.
USING THE BROWSE GROUPS PAGE
Groups & Events > Browse Groups. The Browse Groups page lists all groups, events, etc. in your church or ministry. Using the Search features located at the top of the Browse Groups page, groups can be organized and/or filtered based on Group Profile responses chosen during the group creation process. By default this page is filtered to show only Active groups. Use the Search filters to open up to all groups.
Inactivate a group from the Browse Groups page by clicking the "Inactivate" button for that group, on the far-right side of the page. You can only delete an Inactive Group. See more information here about deleting Groups.
Select groups (check the box to the left of the Group Name), then use the ![]() button to Delete, Update Profile Questions, Update Group Info, Inactivate, and Activate them in mass.
button to Delete, Update Profile Questions, Update Group Info, Inactivate, and Activate them in mass.
CREATE A GROUP
If you have not already worked through the default Group Settings found under Groups & Events > Settings, start there to set up the framework of menus you will need for your groups. These Settings provide options to customize the selections for your individual group settings: Meeting Times, Frequency, Email Reminders, and Reports.

Step 1 From the Create Card on the Home screen dashboard, click Groups or Events to create a group.
Step 1 is the Group Information. Some fields may not apply to particular groups. Detailed steps and descriptions of each field can be found here.

- Maximum Size - limits the number of people who can register for this group if applicable.
- Address, City, State, and Zip are used for mapping groups if desired.
- Report reminder emails are used to make it easy for leaders to click a link in their email on their phone to complete a meeting report. If applicable, they are sent out based on the meeting day, frequency and morning or night selections.
- The Monthly Group Report is emailed to the Account Contact and the Attendance/Report email listed under Groups & Events > Settings > Basic.
Step 2 Select the leader, individual or couple, of the group.
Step 3 Select responses that will organize the the groups based on ministry profile questions. (The settings for these options are built by navigating to Groups & Events > Settings > Profile Questions)
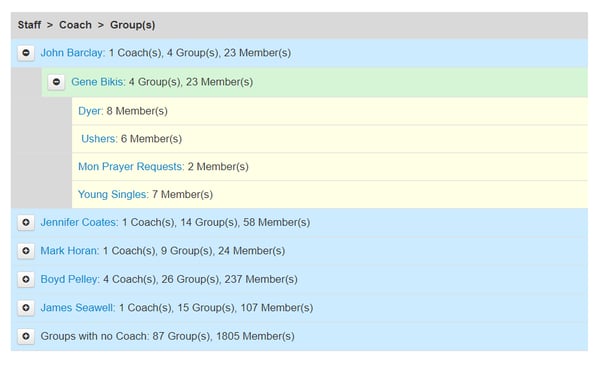
ORGANIZATIONAL CHART
During the group creation process you have the option to select a coach (direct overseer) and a leader. You can also set up a coach in the Coach Area underneath the Groups & Events button.
Navigating to Groups & Events > Settings > Basic allows you customize titles for 3 levels of leadership. Default is leader, coach, staff. Remember these apply to leadership of everything that involves more than one person, so a generic term is preferable. Once customized, this language is used everywhere else including under the Groups & Event button.
Coach Area is used to select direct overseers of multiple groups and then populate the groups underneath them.
Staff Area allows you to select those who oversee the coaches and then assign coaches to them. The result is an overview of your entire organization.
Learn more about the Coach and Staff area settings.
REGISTRATION SETTINGS

Although "Registration Settings" is not a menu item found under the Groups & Events button, we felt it important to include a word about the subject here. The Registration Settings are actually specific to the group where the registration is used, so the settings are done from within the group for which you want to add a registration.
For any class or event that you want to add a registration to, first create the group. Within the group, click the blue Registrations buttons, then Settings. You will customize everything related to the registration on this page. A link will automatically be created for you to use on your web page, social media, or to share in email or text. Click HERE to see an article on how to create a registration.
VIDEO RESOURCES
Groups Academy Webinar - How to create, organize, and maximize CT for small groups.
Registration Academy Webinar - The basics for creating registrations and some of the most common ones.