How do I customize the Check-In Settings?
Creating a Check-in by editing the Check-in Settings and assigning Groups to a Check-In View in Churchteams
There are two essential steps for setting up Check-In: Creating or editing a Check-In View and assigning Groups to the Check-In View. A third step, setting up an automatic schedule, is optional.
The framework of Check-In is called a Check-In View. This is essentially the settings for a Check-In session. You can set up a number of Check-In Views, if your needs are different from one occasion or program to another. For example, the check-in needs may differ from Sunday morning check-in to Wednesday night Awanas to Weekday Mother's Day Out. As such, you would have 3 different Check-In Views, one each for those different programs/events.
VIEWS / SETUP
To set up a Check-In View, go to Check-In > Views/Settings. Click the  button. Enter a name for the Check-In View. The name of the Check-In View is typically something that will relate to the event(s) for which that Check-In is being used, such as Wednesday Evening Youth.
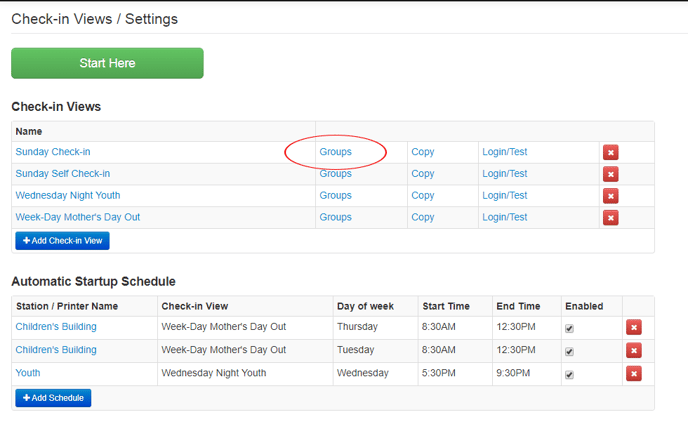
You do not need a Check-In View for each group. Set up a Check-In View and then associate the groups that will be using that View, by clicking the Groups link to the right of the View name on the Views / Settings Page.
After naming the Check-In View, you will be able to choose the following settings on this page:
- Child security label options - what is displayed on the child label
- Parent security label options - what is displayed on the parent label
- Family Check-In options - the fields that show on the Check-In screen
- Add New Family options - the fields when adding a new family via the check-in feature
- Other options - here, you can edit the appearance (including adding a logo) of your Check-In screen as well as set options for the search criteria during a check-in session.
Each section has an image following the settings. The image is labeled with the corresponding setting to show you what you are editing. As you work your way through the settings, it is best to refer to the image often until you are more familiar with the settings on this page.
*Note: The edits you make in the Check-In View Settings page will only affect that particular Check-In View.
ASSIGNING GROUPS
Once you have created or appropriately edited the View for Check-In, assign the Groups that will use that Check-In. To do this, go to Check-In > View / Settings. Click the Groups link on the row of the Check-In View to which you want to assign Groups.

Check the box for any groups that will use this Check-In View. Checking the box to associate a group with this Check-In View will prompt a drop down menu to appear, giving you options for Security Labels, Name Tags, or No Labels for that particular group. You can have some groups use labels while other groups (Youth groups for example) do not, all in the same Check-In View by selecting the appropriate option in the drop down menu.

AUTOMATIC STARTUP SCHEDULE
In order for a Check-In to be active, a printer station must be active. To avoid having to physically to to the church building and start the check-in stations, set up an automatic startup schedule. This will allow for an automatic start up and end for a check-in station/session. This feature is most helpful for Text-to-Church and All-Check. To set up an automatic schedule, go to Check-In > Views / Setup. Click the  button. Insert the name of your Printer station you will be using for Check-In, or if you will not be using one, just enter any name such as "Any Printer" with the understanding that no labels will actually print. Set the appropriate day of the week, Check-In View to be used, and a start and end time. Click Save.
Now your Check-In is set up and ready to go!
For details about equipment such as computers, tablets and label printers, or questions or other questions about classroom management, please see our other Knowledge Base articles covering Check-In.
