
Updating Family Roles (If necessary)
Before you begin either automated or manual Promotion, consider if you will want to change the Family Role for anyone that is to be promoted, such as Child to Student for those going into a particular level of school, or Student to Adult for those graduating. (This is more easily done in mass, while they are still a part of their current group/class.)
- To do this, first go to the group, such as 12th grade.
- Select everyone in the group/class for which you want to change the Family Role (the exception would be group leaders/class teachers). After making your selections, click the green Action button, then select the option to "Update Member Data".

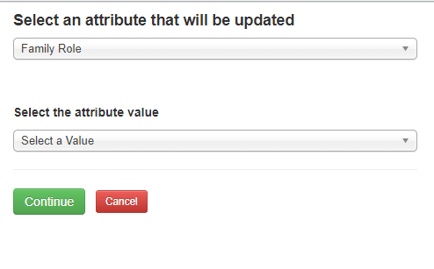
- Click "Confirm" to confirm that you want to make the mass change for all the people selected. Select, from the dropdown menu that appears, "Family Role" as the attribute you want to update. Use the dropdown to choose the new Family Role (Ex: Adult) and click Continue.
Promotion works best when Children and Youth ministries promote at the same time. It is important that you start this process with your OLDEST class/grade so that you empty the oldest group first, making it available for the next grade to move in. If you are unable to move the middle or high school groups before you need to promote your elementary classes, create a group to use as a temporary holding group until the youth groups are ready to receive those children. When ready, we recommend that you merge the temporary group into the actual class they will use long term, in order to preserve proper attendance data.
To begin promoting, update any other people attributes such as Grade in School or Graduation Year that you use. *This is only necessary if you have a Custom People Attribute that needs to be updated because students are changing grades, such as Grade in School. If no further info needs to be updte, skip these next three steps, and move straight to Promotion WITHOUT updating attributes.
- Select everyone in the group/class or at least everyone you want (the exception would be group leaders/class teachers) to promote out of the group. Under the green Action button select the option "Update Member Data".

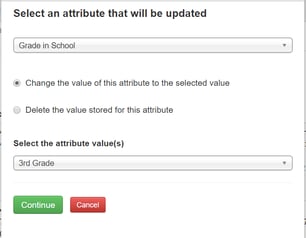
- Click "Confirm" then in the pop-up box, use the dropdown menu to select the attribute you use to track grade/year. Use the default option "Change the value of this attribute to the selected value" and use the dropdown to choose the new grade and click Continue. Note: If this is your previous group of Senior or 12th-grade students, you can now change this to College, Adult, or leave blank rather than choosing a new grade/year.
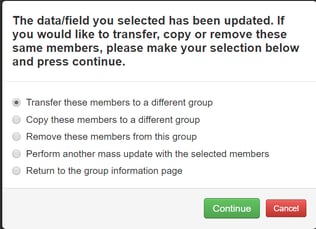
- This will update all of their people profiles. It will also take you to a page to select what action you want to take regarding their group involvement. In this case, choose "Transfer these members to a different group" and then select the next group you want to move them to. For the oldest grades, you may choose to remove people from the group rather than transfer them, unless you have a College or Singles group for them.
Continue to move to the next oldest group and so on.
This process will leave the oldest group empty so that you can go to the next group down and follow the same process to promote them. Work this process backward until all the groups/classes are promoted.
Promoting WITHOUT updating attributes:
You may not track people attributes such as Grade in School or Graduation Year and therefore do not need to first update anything, but just simply promote from one grade to the next. If this is the case:
- Select everyone in the OLDEST group/class (likely 12th grade)or at least everyone you want (the exception would be group leaders/class teachers) to promote out of the group. Under the green Action button select the option "Remove". ** You will only REMOVE people from teh OLDEST class - all other classes will instead transfer into the next highest grade, but the oldest class must be emp[tied out (remove the people) first. Removing someone from a group only removes them from that group, but the record remains in your database and any other group they are currently in.
- Go to the next oldest class/group (likely 11th grade) Select everyone in the group/class or at least everyone you want (the exception would be group leaders/class teachers) to promote to the next grade. Under the green Action button select the option "Transfer".
- In the pop-up that appears, select the end date -- the last date you want them to have membership in the class they are leaving, then Confirm.
- Next select the group/class to which you are transferring or promoting them and retain the current group role and confirm the Group Join Date for the new class, then Continue.
- Repeat this process moving down through your grades until promotion of all classes is complete.
Handling Multiple grades in one class.
For groups with multiple grades, click on the header of your Grade column to organize the children by grade. Then select the oldest ones, and follow the process to update their record and transfer them to a new group. For the others, select who is left and using the Action button update the People Attribute for them.

If you do not track Grade as a People Attribute and therefore do not have a People Attribute to first update and only need to move students to a new group:
Start with your oldest class first, and select everyone in the group (or everyone to promote out). Use the drop-down menu from the green Action button to select Remove to remove the oldest students from the group if they will no longer be in a group, or Transfer if they will be moving into a College or Young Adults class.
Continue as described above, by then going to the next oldest class, selecting members then Transfer to the class above what they are currently in.
Classes with synched rosters.
A note regarding Roster Synching: For groups/classes where the Rosters are synced together, you will only need to promote one of the classes. The system will mirror the action for all other groups/classes.