
Workflows are simply a set of steps that you create to automate your repetative tasks such as emails and follow-up with new guests, moving people from one group to another after a period of time or a certain step has been completed, etc.
There are essentially four main steps to creating a Workflow: Map It, Resource It, Build It, and Activate It. Let's get started!
Step 1: Mapping Your Workflow
Always begin with the discipline of identifying the goal of the workflow, e.g. The goal of the "First Time Guest" Workflow is to get people to come back as a Second Time Guest. Now, map out the route for meeting your goal.
- Identify First Time Guests and have them added to a group
- Send emails or texts
- What people attributes should be updated, e.g. date attended, church member type, etc.
- Which groups should a person be added to or removed from
- Are there other workflows the person should be unenrolled from when entering this one
Step 2: Resourcing Your Workflow
The resources for your Workflow include any email or text templates, member attributes, or groups that you thought of in your Mapping Step.
- Create the emails and texts that you will regularly send out as part of the workflow, as a template. (Communicate > Email > Template, or Communicate >Text >Template)
- Check to see that any member attributes you will update already exist and if not, create those. (People > Settings > People Attributes)
- Check to see that you already have the groups set up that you will be using in your Workflow, and if not, create those. (Groups & Events > Create) Here is an article on how to create a group: How Do I Create a Group?
Step 3: Building Your Workflow
Go to Communicate > Workflows. Churchteams always builds at least two sample Workflows into your software subscription so that you have two samples to check out. Go ahead and click on the title of either one and take a look.
- To get started creating your own Workflow, from the Workflows page (Communicate > Workflows), click the
 button located at the top of the page.
 - Give your Workflow a name and description. Enter an email for anyone who may reply to emails during the Workflow.
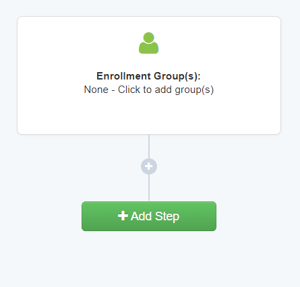
- Click the "Enrollment Groups" to select the group(s) to which you want to apply this Workflow. People are only enrolled in the Workflow when they register into this group first. (*See Notes Regarding Triggering a Workflow at the end of this article.) If there are people already in the group that you are going to use and you want to enroll them in the Workflow, once you have finished creating the Workflow, go to this group, select the people you want to enroll and click the green "Action" button, then "Enroll in Workflow."
- Click the "Add Step" button to add the first action or resource from your Mapping Step. This is typically an email or text communication sent to the person who has been added or registered to the group. The next step is often unenrolling a person from another Workflow if they are in another.
- Continue using the "Add Step" button as you add steps from your Map, also adding in "Wait for..." periods between steps before the next action takes place. An example might be to Send an Email (using a template), Wait For... (5 days), Send Text.
Step 4: Activating Your Workflow
Once you have all the proper steps in place, click the "Back to Workflows" link located in the upper left corner. All Workflows are, by default, Inactive until you activate them on the main Workflows page. This allows you to build and edit your Workflow and leave it dormant until you are ready.
Use the Inactive (or Active) red (or green) button to toggle between Active and Inactive.
Also on this page, use the "Copy" button to copy a commonly used Workflow that works well and may only need a step or two changed (such as a different email and different groups, but otherwise steps are the same) to work for another process rather than creating the Workflow all over again.
Notes Regarding Triggering a Workflow
- People are only enrolled in a workflow when they are added into or register for a related, Active, Enrollment Group. This means ...
- A workflow must be made active before people added to a related Enrollment Group are enrolled in that workflow.
- If you create a workflow and select an Enrollment Group with people already in it, those people are NOT automatically enrolled in the Workflow.
- The easiest way to enroll these people is to go to the group, select all, then click the Action button, and then Enroll in Workflow.
- If you re-add or re-register a person into an Enrollment Group they were in before a workflow was started, they will be enrolled in the workflow.
- If a person has completed a workflow already, they can be enrolled again if they are added to the same Enrollment Group or register again. However, if a person is still actively in the process of a workflow and is added to or registers for an Enrollment Group, they will not get double-enrolled.