
Set up Guest Registration Form
Edit the Check-In Settings & Link Classes to Check-In
Set up an Automatic Startup Schedule for Check-In
Set up Groups for Check-In and Guest Registration
Because All-Check allows you to use a customized registration form to collect guest information and check-in existing church-goers, the first step is ensuring that you have the necessary groups properly set up.
Check-In Groups
In order to check someone in, you'll need to have a class/group where the attendance is tracked. Some of the groups you may want to use are included by default in your Churchteams account unless they have been removed. Review the list below to see if you need to add any of the following:
- Worship Attendance Group: Your account has a default Worship Attendance Group. If the group has been removed, create a new group and be sure to set the Group as a Worship Attendance group in the Group Information settings by going to the blue Edit > Group Information and select "Adult Worship / Youth Text Attendance."

- Youth Ministry Group(s): Your account has one default Youth group. If this has been removed, create the group with the same Worship/Youth Attendance setting as shown in the image above. If you have more than one Youth group, create all the groups you will use for attendance.
- Children's Ministry Group(s): Your account has default Children's classes - a Nursery, Preschool, and Elementary class. Use the Edit button in the Group to Copy any of these groups to quickly create additional classes. Once you copy group settings, be sure to rename your new group.
- Adult Ministry Group(s): Your account has a default Bible Study group. Create (or copy the group settings of the default group to add & rename) additional Small Group or Bible Study groups for which you want to track attendance.
Guest Registration Groups
Your Churchteams account has a Guest Registration - Adults and Guest Registration - Kids group by default unless these groups were removed. If you have removed the groups, we recommend creating them so that Guests can quickly add their information and check-in.
- Guest Registration - Kids: We recommend that you use separate Adult and Childrens groups for collecting Guest information. There are two reasons for this. (1) You can collect different information in each group, such as Grade in School, which wouldn't apply to Adults, and (2) you will be able to use the Adult group for communication purposes with Workflows. (The child information is optional and the form can be skipped by the registrant)
- If you wish to use the responses to the form questions to auto-register the Guest into other Groups, we recommend you set those groups up now as well and select the appropriate auto-register group in the Registration Settings of this Guest-Registration-Adults group.
Ex: Response of "Would like more information about a relationship with Christ" can auto-register the guest into an administrative group for Pastoral Contact (if that group is set up and auto-enroll is set)
Ex: Indicating a Grade in School for children can auto-register the child into the appropriate Children's Ministry class
- If you wish to use the responses to the form questions to auto-register the Guest into other Groups, we recommend you set those groups up now as well and select the appropriate auto-register group in the Registration Settings of this Guest-Registration-Adults group.
- Guest Registration - Adults: This group will hold the initial registration form a guest will see if they attempt to Check-In and are not already in your database. Go to this group, then click the "Registration" button, then "Settings" to customize your form.
- Set the Registration Completion option to "Guest Registration - Kids" in the Registration Settings of the Guest Registration- Adult group in order to move the registrant from the Adult information form to the Child information form.

- Set the Registration Completion option to "Guest Registration - Kids" in the Registration Settings of the Guest Registration- Adult group in order to move the registrant from the Adult information form to the Child information form.
Set up Check-in
Go to Check-in > Views/Settings.
- To edit the Settings for the All-Check view, click the name "Sunday All-Check."
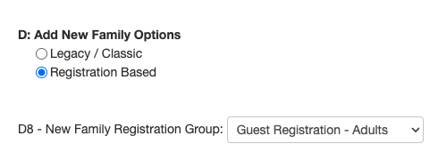
- When using All-Check, to allow the Guest Registration forms to pop up for Guests, you must select "Registration Based" in Section D.
- Select "Guest Registration - Adults" from the dropdown menu in D8.
- Select "Guest Registration - Adults" from the dropdown menu in D8.
- If you use a digital bulletin or newsletter, scroll to the bottom of the Settings page to enter the URL. This will land the existing family or guest on the page of the bulletin after check-in is complete.
- Be sure to SAVE the Check-in view Settings at the bottom of the page.
Link classes or groups to your Check-In view
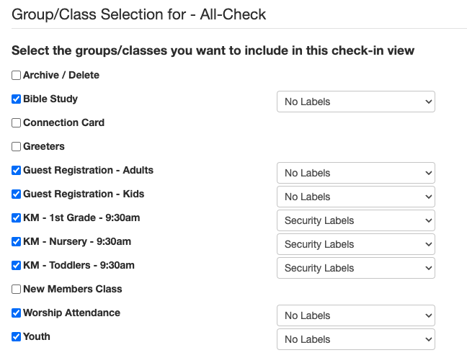
On the Check-In Views/Settings page, click the Groups link to the right of the Sunday All-Check.

- Check the box for any group you want available for Check-In, such as Children's classes, Adult Bible Study, Worship, and Youth Attendance.
- To the right of the Group name, use the dropdown menu to indicate your preference of Security Labels, Nametag Only, or No Labels
Set up an Automatic Check-In Startup Schedule and Printer Station
- On the Check-in Views/Settings page, click the blue "Add Schedule" button under the Automatic Startup Schedule section.
- Name the Check-In / Printer station where parents should pick up their printed security labels. If you are not printing labels, but want the benefit of an automatic startup for check-in, just name the station "All-Check" - having a printer is unnecessary unless you want to print security labels or nametags.
- Choose the day and times for check-in to run.
- Choose the Check-in view that will be using the automatic startup (Sunday All-Check for example).
- Save the settings.
Note: If testing All-Check on a different day than the say you set up in your automatic startup, you will need to edit the day to the day you are testing so that Check-in is open.