
Attendance in Churchteams can be captured in two main ways: Check-In and Leader entry. But there are some options within each of these options. Let's begin with Check-In.
Capturing Attendance through Churchteams Check-In
Open a Check-In session, and it's instantly available to meet people where they are: on their phone through the Churchteams app, with text, or at a traditional kiosk.
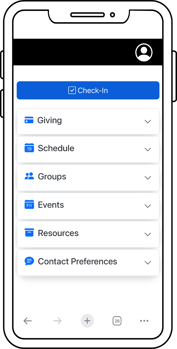
App-based Check-In
When you have a Check-In session open, your app users will see a blue Check-In button at the top of the screen, making it easy to check in the whole family. Have them click the blue check-in button, check the box for each family member present, then Check-In. Attendance will be recorded for each group they check into. You can see, add to, and edit the attendance for any group by going to that group, clicking the blue Reports button at the top of the group roster, then click Meetings. Click the meeting date that you want to view or edit.
To connect more groups to the Check-In View you are using, from the main navigation menu, go to Check-In > Views/Settings, then click the Groups link for the view you are editing.
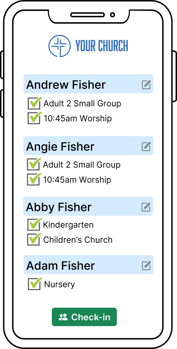 All-Check (Texting to Check-in)
A person texts CHECK or CHECKIN to your church's Text-to-Church number. They get a link back to check in each family member to the appropriate class, group, or event.
To have the security code texted back to the parent, ensure that setting is enabled. From the main navigation menu, go to Check-In > Views/Settings. Click the name of the Check-In View you are editing. Open section B: Parent Security Lables, then select the appropriate option for B5.
Check-In Station or Kiosk
You can set up a traditional Check-In station even while people are using the Text and App methods. All attendance, whether done through a text, the app, or at a Check-In station will sync up into one meeting report for that date.
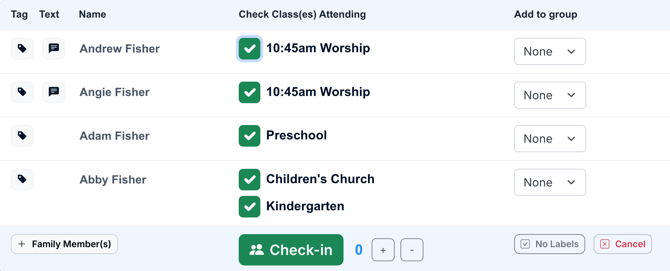
To learn more about configuring your Check-In station settings, see: How do I customize the Check-In Settings?
By using a check-in station, a person will search for their family by using a name or phone number, then check the boxes for the classes or groups they are attending. Click Check-In when done. If Security labels are set to print for any of the groups someone checked into, those will print after clicking Check-In. Label options can be selected for each group connected to your check-in by going to Check-In > Views/Settings, then clicking the Groups link for the Check-In View you wish to edit.
Capturing Attendance through Group Leader Access
There are 4 different ways leaders can take attendance: (1) through the App, (2) by texting a Keyword, (3) by accessing an automated, emailed link, or (4) by using traditional paper and pencil (which can later by entered into your Churchteams account).
(1) Leaders can take attendance for thier group through the Churchteams App.
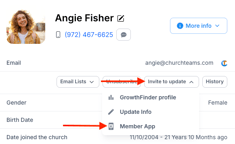 To have your leaders take attendance using the app, first invite them to install the App. To do this, go to the member's profile then, on the left side of the screen, click the "Invite to Update" button located below their name. Then click Member App. This will open up an email screen, so that you can send them a personalized link for the app.
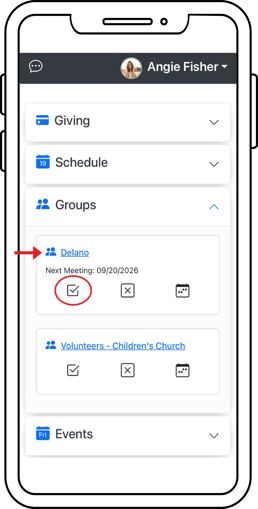 From the App, leaders can use the Groups section to access any class, group, or event they lead. Click the name of the Group, to expand the section, then click the attendance icon to record attendance for those present. You can also add notes and prayer requests for the group. It's important to click the Save button at the bottom of the screen.
(2) Leaders can take access their group by Texting a Keyword, then taking attendance. (Similiar to the App method, without needing to install the app first)
Anyone who has a phone number on record in your database can text the Keyword ME to your Church's Text-to-Church number to access groups they lead (and more!). After texting ME, a link is returned connecting them to the same screen they would see in the Churchteams App. From there, you can click to expand the Groups section, then click the Group Name, then the attendance icon for that group. Check the box for anyone present, add Notes and prayer requests, then save the information to be stored in your Churchteams account.
(3) Leaders can take attendance using the Meeting Link sent in the automated Meeting Reminder emails.
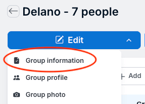 If a leader would like to take attendance using emailed reminders which include a link to the attendance roster, you will need to first ensure that the group is set up properly for the automated reminders to be sent. To do this, go to the group. From the group page, click the blue Edit button, then Group Information.
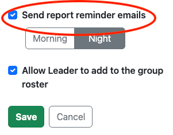 Once on the Group information page, check the box (located on the second row up from the bottom) to "Send report reminder emails. Then click Save. This ensures that the emailed reminders will go out according to the Meeting Frequency and Meeting Day (also indicated on the Group Information page).
The emailed reminder contains a link for the leader to open, view their class or group roster, then check the boxes, taking attendance for those present. This is the same roster screen, with an option to add Notes & Prayer Requests, as described in Methods 1 & 2 mentioned above. After taking attendance, Save the information.
(4) Leaders can take attendance on a traditional paper roster and church staff use that to enter attendance into Churchteams.
Churchteams has a report that you can use to create printable rosters for those groups who wish to use paper and pen for taking attendance. To create the printable roster, from the manin navigation menu, go to Reports > New. In the Groups section of Reports, select Check In Roster (Printable).
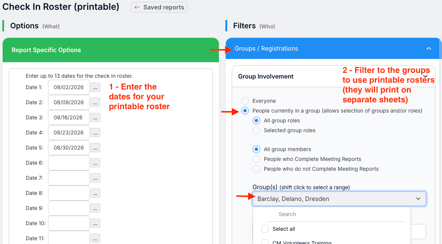 In the Options column on the left, enter the dates that you want to include on your attendance roster. We recommend just doing this for one month at a time so that the printed report is easy to read and comes back to you at the end of each month.
In the middle Filters column, filter to the groups that you'd like to print rosters for, by clicking Groups / Registrations > Group Involvement > People currently in a Group. Then Select the group(s) from the Group dropdown menu.
Last, in the Review column on the right (not shown in the above image), click Go to see your report. From here you can print using the button at the top of the screen on the right. We also recommend that you add this as a Saved Report, by clicking the green button at the top. You will have to reset the dates each time you access the Saved Report, but your Group Filters will already be in place, saving you a bit of time.
Once you are ready to enter the attendance, navigate, from the main navigation menu, to Reports > New, then select Attendance Data Entry (listed just belew the printable Check In Roster. You will once again enter the dates, and filter to the groups just like you did for creating the printable roster. Then click Go in the right Review column.
On the screen that follows, click "start data entry." Enter the attendance by checking to boxes for people who were indicated present, then click save and the system will take you to the next date, group by group.
All of the attendance capturing methods listed above, whether using a Check-in Station or Leader entry, will store the data in your system, and can later be accessed through our Attendance Reports.