How do we manage requests for personnel, funds, and resources?
There are 4 steps to do this: create a group, create registration attributes, customize registration settings, and customize the group view.
We built our registration feature to be profoundly robust. It is capable of handling these types of requests from staff and others who have access to the link or keyword. Here's how it works.
- Create a Group. I called it the "Request For Resources" group and made it browsable at the Group Admin level. This way only the top 2 levels can see the requisitions. But, anyone with the registration link or keyword could complete the form.
- Create Registration Attributes. These are the questions you will add to the form that only relate to this form. Groups & Events > Settings > Registration Attributes gets you to this page. Here's the ones I added:

Note: I set the security level for Approval and Approval Date to Group Admin so that only the top 2 levels have the ability to approve a request. - Customize Registration Settings. Back in the group, click Registration > Settings.
- Create your text-to-register keyword.
- Provide instructions to help those completing the form.
- Use the Leadership Notification Email box to email the approval person (group leaders) when a request is made.
- Use the Completion Message and Confirmation Email to receive the request and set expectations for a response.
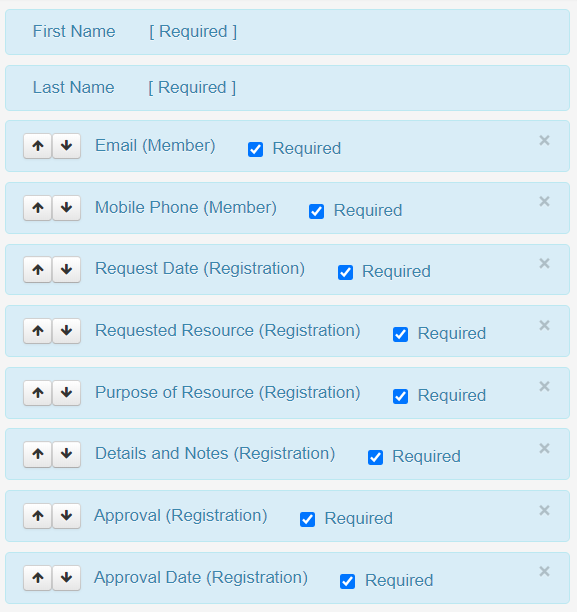
- Customize the form fields:

- Save the registration.
- Customize the Group View. I called this one the Resources view and made it only viewable at the top 2 levels (Group and Financial Admin) since it will not be relevant to anyone else.

I selected the option to automatically include the registration attributes.
Here is what the group view looks like to help me manage resource requests. The group is only viewable at the top 2 levels, and the Approval and Approval Date do not show up on the registration form. Complete these by clicking the white Edit button.

