
1. Merge duplicate records
Go to People > Person > Merge, then run each of the Possible Duplicate People Reports starting at the top. You'll see that each one gives you the criteria the report is using to locate duplicates. It is a good idea to have an admin or pastor with social knowledge of the church present to evaluate these. Not every suggestion is an actual duplicate.

2. Merge families (put family members into the same household)

3. Archive/Delete people.
To do that, take a look at our detailed article HERE.
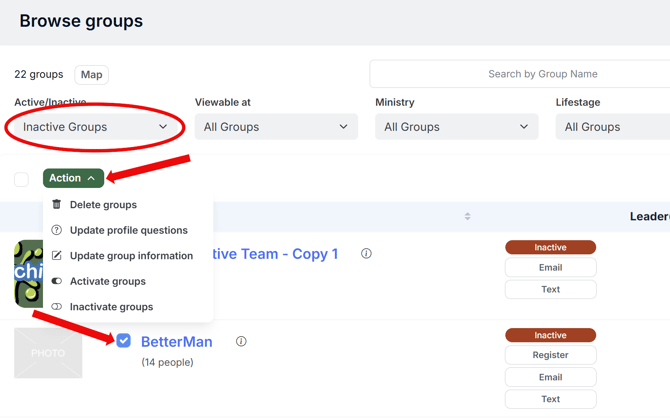
4. Merge, Inactivate, and/or Remove Groups.
A common, but not best practice, is to create a new group or event every time something like a New Members class or Vacation Bible School happens. The result is an excessive number of active groups.
Merge similar groups.
Inactivate groups you aren't currently using but will use again.
Remove groups that are several years old, and you will not use again.
5. Clean up the Group (Ministry Type) Profile.

6. Realign groups to the cleaned-up Ministry Type options (from step 5)
Go to the Browse Groups page and use the filters to see all the groups currently listed under a Ministry Type you noted in Step 5 for deletion. Go through the list of groups and select the ones that are going to be moved to a different Ministry Type by checking the box to the left of the group name. This will turn the Action button green. When you've selected all the groups to be moved to a different ministry type, click the Action button and then "Update Profile Questions". This will take you to the page to mass update the profile questions for the groups selected.

Once you've completed these actions for all the ministry types you are removing, go back to Groups & Events > Settings > Profile Questions and delete that Ministry Type by clicking the red X to the right of the type you want to delete. This will clean up the Ministry Type filters so that you can effectively use them as filters for reports.
7. Clean Up Saved Reports
Enlist the help of other staff members who create and save reports for this step. Charge each person who has saved reports by cleaning up their list.
Go to Reports > Saved. By default, these are already filtered to you, as the account user logged in. Review your list of Saved Reports. We suggest making a list of reports you plan to delete and sending this list to other staff members to verify they do not use these before deleting anything. When you are ready, use the trash icon on the right side of the page to delete any reports you no longer need.
While reviewing your list of Saved Reports, we recommend adding Tags so that filtering to find reports shared with other staff members is easier.