Check-In
An overview of the setup and implementation of Churchteams Check-In
"How do I set up check-in for our church?" The answer to that question is dependant on your technology configuration and specific needs for each ministry using Check-In. This tutorial will walk you through the decisions you need to set up a Check-in that is right for you.
Churchteams offers a variety of flexible Check-In methods to fit your ministry’s needs. You can choose from our mobile app, hosted stations, kiosks, mobile greeters, self check-in stations, convenient text-based check-in, or a hybrid of those choices. If you only need attendance data and don’t require an actual check-in station, class leaders can take attendance directly through the app or by using an email reminder link.
For this help article we will focus primarily on children's ministry check-in, but we will include some options for youth, adult and all family options.
Let's Get Going with Your Options:
What are your needs?
- How many children do you plan to check-in in a week? This helps you plan for supplies and hardware.
- How many children do you check in for your largest session or Sunday School hour? We recommend one label printer for each 35 to 40 kids that check in.
Space: Now that you have an idea about how many label printers you need, think about your space and where you want parents to check in their children and pick up name tags. People are standing up, so make sure the table or shelf is the right height.
Check-In Method: Next, you need to determine how you want people to check in. You can use one or a combination of the following options:
- Check in from the App. Once the app is installed, anyone in your database can check into their classes or services with the tap of a button.
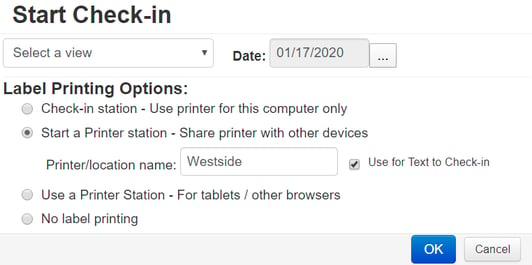
- Text-to-Check-In. People simply text the word CHECK or CHECKIN to your Text-to-Church number, then check the whole family into available classes or services all in one screen. **When you start a Printer station, check the option "Use for Text to Check-in".
- Check-In Station. A check-in center—whether it’s a kiosk, desk, or dedicated area—typically uses a single computer connected to a label printer. By selecting “Start a Printer Station,” you designate that computer as the driver, allowing it to connect label printing for other check-in devices.
- Tablet. Whether you mount iPads or other tablets near the label printer or use them as mobile devices, simply log in and select the "Use a Printer Station" option. This allows the tablet to act as a check-in screen that connects directly to the computer running your label printer.
- Text-to-Attend - Best for youth ministry. One person sends a simple Keyword text, which marks their attendance.
- Text-to-Me - Best for leaders to quickly access (via the Churchteams App or an attendance reminder email) and take attendance in a group roster on their phone.

IMPLEMENT
In general, here are the five steps to implementing Check-in.
- Create your groups/classes/worship services. Create the groups you want people to check into. (Think of all your children's classes, worship services, youth classes & serving teams, adult classes & serving teams for which you want to track attendance.)
- Get your equipment. We currently recommend any Windows 11-based (or later) PC, Brother QL 820W wireless (even battery if you want), or Dymo Turbo 450 for USB label printers, and any tablet. HERE is a detailed article on our recommendations!
- Set up your label printers. Follow the instructions listed on the Label Printer Info/Recommendations page. We recommend using Chrome or Microsoft Edge as the browser for Check-in.
- Customize your Setup. Go to Check-In > Views/Settings. From here, by either adding a new View or choosing an existing View, you are able to customize your security label options and check-in screens.
- Link Groups to the Check-in View. Clicking the Groups link on the Check-In Views/Settings page allows you to select the classes, teams, and worship services that people will be able to check into when your church is using that View/Setting.
- Bookmark the login link. Make it easy to start check-in by putting an icon on the desktop of your check-in computer and any tablets. You will find the correct steps for adding the check-in icon to your desktop in the Setup section of our Check-In Knowledge Base.
For more details on specific questions related to the implementation and use of Churchteams Check-in, check out our Knowledge Base Articles and/or sign up for the Check-in webinar. Once you have everything set up, be sure to test it with a quick practice run.
VIDEO RESOURCES
Kick-Start Guest Registration and Check-in - Short setup and overview
