
Install Label Printer
- Install the label printer software and driver on the Mac and make sure it's working with a test print of a few words from the Notes application. Set the label printer as the default printer to be used and set the default paper size to the size of the label you are using (2.4 for Brother Printers) .
Customize Settings In Edge
Note: Be sure to download the latest version of Edge HERE.
- Open Edge, log in to Churchteams, and start check-in (Check-in > Start Check-in) with any Check-in view.
- Pick anyone in a group class or class associated with that check-in view that has labels enabled and click Print. This will open a Print screen.
- Print a set of labels for a selected person.
- For Destination, choose your printer.
- For Layout/Orientation, choose Landscape.
- Click “More Settings” to view additional settings
- Choose your Paper size (For a Brother printer, choose 2.4)
- For Margins, choose Minimum.
- For Options, uncheck “Headers and footers” and check “Background Graphics”
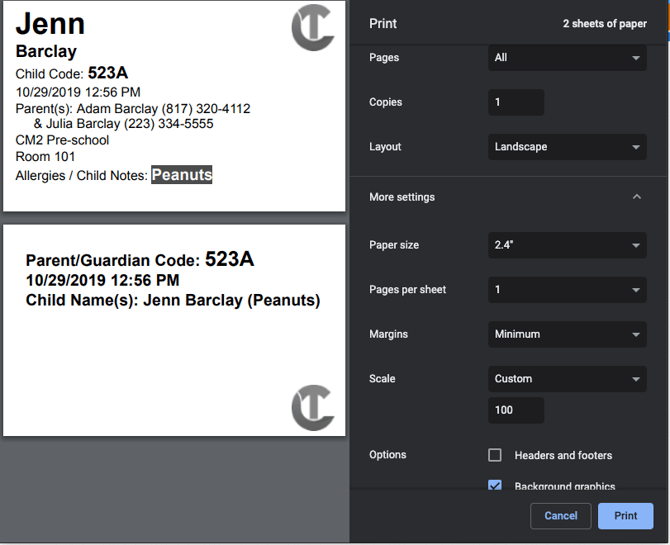
- Click Print to confirm that it is correct.
Save For Quick Access
- Once you get a clean print, close the webpage and completely quit Edge. (This will save your settings.)
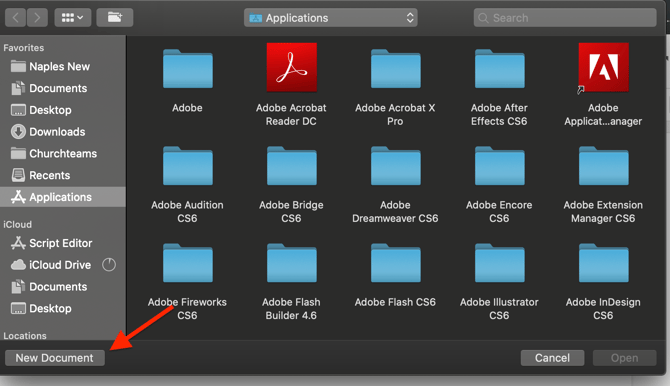
- In Spotlight, search for “Script Editor”.
- Click “New Document”.
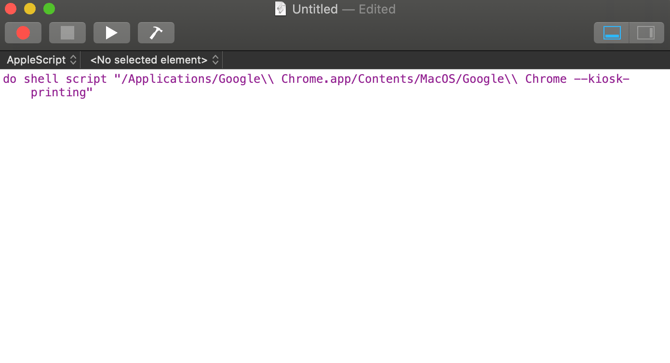
- Paste in the following text: do shell script "/Applications/Microsoft\\ Edge.app/Contents/MacOS/Microsoft\\ Edge --kiosk-printing"
- Click the File menu and click Save.
- In the dialog box, enter "Check-in Startup" for Save as or some other description like that.
- In the Where box, select Applications, and then in the File Format dropdown also select Application and click Save.

- This will create a new icon in Applications that you should move to the Dock or the desktop and use this icon (not the regular Edge icon) to start Edge in kiosk mode, but most importantly it will enable the auto printing.
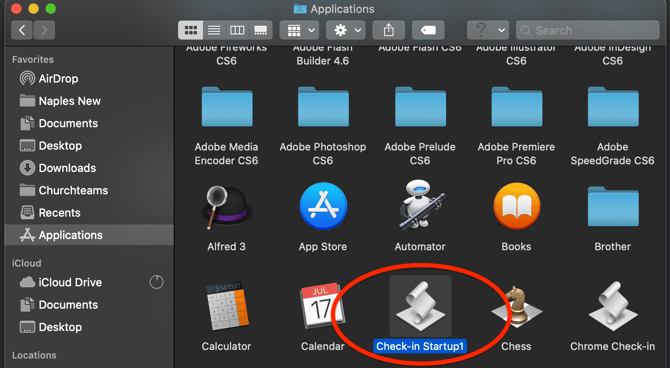
- Click on the Edge Kiosk icon you created and go to the Churchteams login page.
- Be sure to click on the white Check-in Login button, and once on this page, save this as the home/startup page by clicking on the three-dot menu in the top right-hand corner of Edge > Settings > Start, home, and new tab page > Open custom sites > Use all open tabs. This will ensure easy access for your volunteers when starting up a check-in station on Sunday morning as it will automatically open up to your Check-In login page.
NOTE: You must start the check-in system using this special icon to suppress the printer dialog and you cannot already have another normal Edge window open when you click this icon or the suppression of the printer dialog will not happen. For this reason it’s best to hide the original Edge icon (at least from the Dock) so that a volunteer doesn’t start Edge using the normal icon.