How do I set up registration for mission trips and fundraising?
Create groups for each mission team participant and give them leader level access to manage their supporters.
Staff Set Up
Mission Team Participant Directions
Donor Experience
Resource: Email template for mission team participants to edit & send
Staff Set Up
Best practice for mission teams
You can create and manage the full team in a single group. This is helpful as an initial registration, then for tracking training and requirements like passports, and managing ongoing communication. This
blog post is helpful for those details.
For fundraising efforts, create a group for one team member / participant including all the registration settings, especially the leader notification email. After that, just copy the group and rename it for other team members.
1. Create the fundraising / mission group(s).
If it is a fundraising effort like stocking the food pantry, one group is sufficient. But if it is for people going on a short term mission trip or even for long term missionaries, create a group for each participant. Be sure to set up the browse group level as "Guest" in step 1. In step 3, use the group profile questions to be able to sort for these groups on the browse groups page and to filter for collective reporting.
The participant responsible for building a support team and raising funds should be set up as the group leader. This will give them access to build, communicate, and manage their team from their computer or through the Member App including texting ME to your Text-to-Church number.
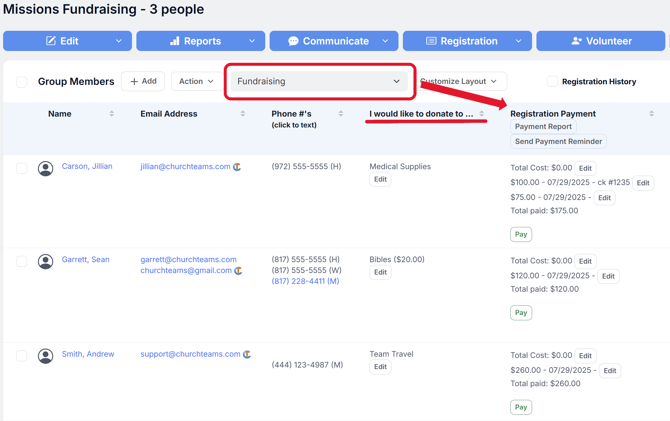
To see donations be sure to customize the Group Members - View to include "Registration Payment" column. (Circled and arrow.)
2. Create the registration form
Click the blue Registration button then Settings.
Scroll to the bottom of the page to set up the registration form. Add any Custom Registration Fields you might want. For project registrations you might want to list specific needs / supplies they may want to give to. The "I would like to donate to ..." column underlined above illustrates this. You can add specific amounts for each option if you would like. (See Bibles ($20) above.)
3. Associate the registration with a contribution fund.
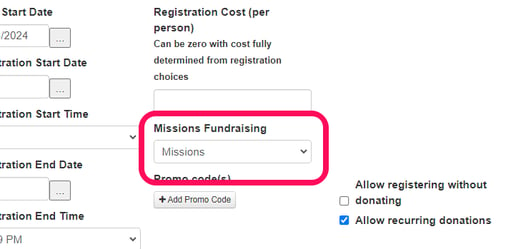
On the registration settings page, choose a Missions Fundraising Fund (circled below). When someone gives, their donation will automatically be posted to their giving record designated to this fund.
4. Write Form instructions, Leader notification email, and Registrant confirmation email
These are the primary three text boxes on the settings page. It is important to make each one of these crystal clear for the intended recipients.
5. Add a Text To Register keyword.
This will enable people to register and give just by texting this word to your Text-to-Church number. They will get a link back to the form then be taken to the payment page. Hint: Once you set this up people will actually prefer this method because this approach will pre-fill the form if someone is already registered. Consider using first or last names of the mission team participant (group leader) as the keywords after you copy and rename the group.
6. Copy and paste the URL link.
Use this link to the group in any email, text, post, tweet, or website you are sending to people telling them about the trip and asking them to register. If you are doing this for a team of people, this is the link you will copy to include in the instructions you give each group leader / mission team participant. (See item 8 below)
7. (For Mission Teams) Create and save an email template / content page t0 share web links.
This resource is to give your mission participants an email / web page to build from. To create it go to Communicate > Email > Templates. Click the blue New Template button and create your unique template in our email editor. Once you save it, be sure to change the security level on the Email Templates page to "Leader" so that they will have access.
When participants save their own version of this template, you will be able to give them a link to share that same content via text, social media, and anywhere else they want. Their instructions to do this are listed below.
You can give them a link to share after their unique template is saved by going to Communicate > Email > Templates. Click the "Create Link" button by the participant's template. Then copy the link and send it to them.
Once links are created, there's no need to create them again. Instead, copy them by going to Communicate > Content Pages.
8. (For Mission Teams) Email each leader instructions to get started.
Once everything is set, you'll need to email each participant / leader instructions on how to get started. Each email needs to include that leader's unique registration link and their unique group access link.
To send this email, go to a group click the blue Edit button > Leader Access Links and click the "Email update group information link to leader(s)" to pull up an email that will have their unique link in it. Here is an example email for your use. Make sure the "Update Group Information" link is the unique one in the original email. Participant / leaders will need this unique link to access their groups on their computer especially.
Hi _____,
We're grateful you are going to be part of the Uganda Missions Team this year. We've created a group in our Churchteams software to help you manage your support team and collect donations.
Below are the instructions for accessing the group, creating your team, creating your email and web page, and managing your team ongoing. You will be able to see how much was donated and by whom in this group.
Step three has instructions for customizing your email and web page in the software. You'll need to swap out the "Click Here" link in that template with
this unique giving link for you. You can also have them simply text your last name to
(123) 456-7890 Don't worry the instructions below will help you. Just keep this handy.
Finally, here is the link to Set up and
Update Group Information for your support team. Keep this email handy to access your group. When people join you will get an email notification with a link back to your group. You will be able to access by text and through the Member App as well.
If you have any questions, let me know.
Thanks,
______
To the bottom of this email include the following instructions.
Mission Team Participant Directions
1. Access the group we've set up for you to manage your support team.
To access it on your computer click the "Update Group Information" in the email above. Star or save this email to access the group when you need it.
You can also text "ME" to (123-456-7890), or open the Member App. In the Groups section, find your missions support team group.
2. Add people to your group.
Click the blue Add button and select today's date. If people you want on your support team are associated with our church already, you will find them in the drop down. For all others, you'll need to add them to the database with their first and last name and email address. We recommend mobile phone number as well for texting purposes.
Note: The drop down list has our church directory. As leaders we ask that you use it only to save time inputting information for people you know would want to be part of your support team.
3. Create an email with your testimony and request.
Click the blue "Communicate" button then "Email" then "Email via Churchteams". "Confirm". Put in your from email address and name. Add in the subject line. Do NOT add email addresses to either the To or the BCC fields.
In the Email Templates dropdown, we've created a default email for you called "Missions Support". Click on this and then click the "Save as Template" button right by it before you edit anything. On the pop-up Choose the radial button to "Save as a new template" and change name to "Missions Support - (your name)".
Now you are ready to edit the email with your testimony and missions ask. Be sure to trade out the "Click Here" link with "this unique giving link for you" in the above email.
Use the "Save as Template" button to "Update the existing email template" which is yours. You need to save the email as a template with your name on it so that we can give you a link to share the email as a web page by means other than text.
When you are finished, send the email.
4. You will be notified when someone registers.
This notification will be by email and includes a link that will take you back into your group to view responses and contributions. If using your phone, turn it sideways to view the full dashboard more clearly in landscape mode.
5. Use this group to email and text updates along the way.
The blue Communicate button gives you options to email and text follow up notes. If you use the option to text by email, you can send the text from your email address so that if they respond you'll see it in your email inbox. If you add new people, you can select them in this group and then send them the same support raising email template that you have saved.
Donor Experience
When mission team participant / leaders send out their communication, here is what their recipients will see / do.
1. Fill out a registration form by clicking the link they receive or by texting a keyword.
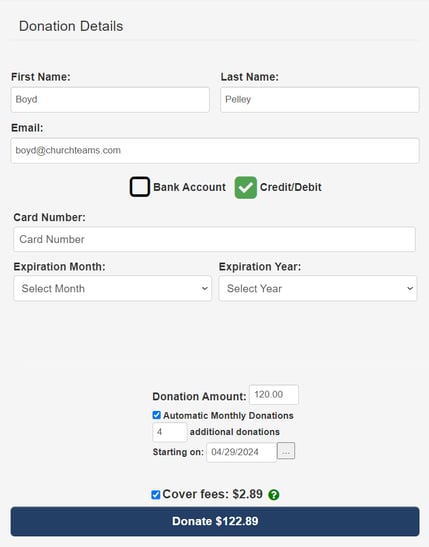
This will take them to the payment page which has been altered to allow them to put in whatever amount they want. When they enter the amount, it will appear on the blue "Give" button. If they chose a specific amount for a dropdown item, that will show up in the form by default. I added $100 to the default of $20 for Bibles that I chose. As illustrated there are also choices for automated recurring donations and covering fees.
2. They are able to give more than one time.
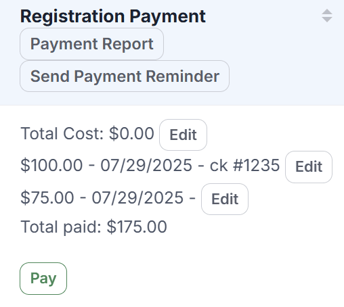
By clicking the same link or texting the same keyword, donors give give more than once. This will be shown on the group info page like this.
3. They receive both a registration confirmation and a contribution receipt.
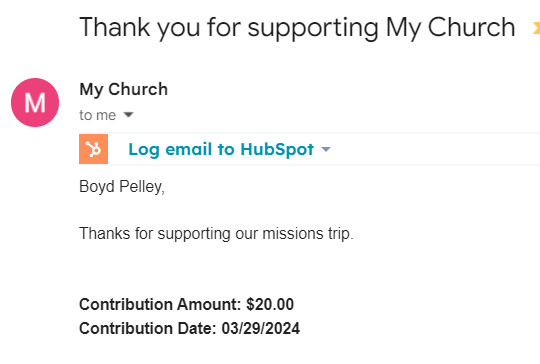
In registration settings, you created a clear email message for the donor to receive after they register for the group. You could add the registration link into this email to give people the option to give again. The contribution date and amount will be automatically added to the registration confirmation email like below.
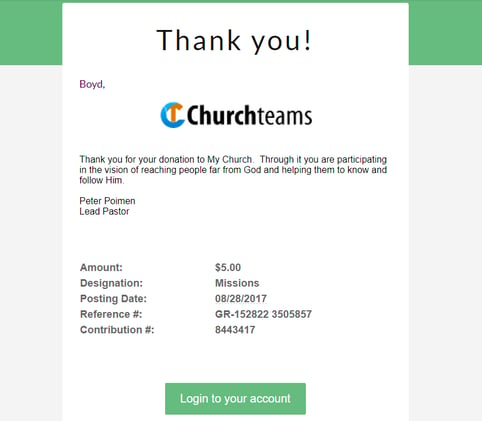
Because this registration includes a contribution, a receipt email is also sent to the donor using the same email format as for all other contributions.
4. This donation is added to their giving record.
This process immediately credits the donor with a donation on their giving record. It will be deposited into the church checking account 2 days later. And the online deposit reconciliation report will help your bookkeeper track the deposit as usual.
IMPORTANT NOTICE FOR STAFF: If the donation is refunded in the group view, the contribution is NOT automatically reversed by a negative transaction. You will need to do that manually.
Resource: Email template for mission team participants to edit & send
Staff: This relates to item 7 in the staff set up section above. Feel free to use this content to create your own email template for Missions fundraising. Make it available at the leader level so mission participants can see it.
(Your logo in top section)
Hi ,
One of the things the Lord has laid on my heart to help me become more and more like Him is to be around and serve people outside my normal life paths. When our church shared the opportunity to join a team going to Uganda this summer, I knew it was something the Lord was calling me to do.
I went to the training meetings to learn more and I would like to share a little of that with you. We will be going to Mbale, a town in western Uganda, to lead a group of pastors and church leaders in what it means to follow Jesus in your family and how to reconcile broken relationships. We will be there four days teaching and interacting with these new friends. In addition we will spend time with mission leaders there learning more about what it means to be a world Christian.
So, here's my ask. First, would you pray with me about this trip. Secondly, would you be willing to help support me and our team financially? I already have saved half of the $3,000 it costs to go and will be giving that to our team.
Please pray about both of these asks. If you have any questions, let me know. And, if the Lord leads you to be part of my support team, you can text GARCIA to (817) 677-9850 or just click here.
I will be sending email and text updates along the way.
Thank you for praying and responding any way the Lord leads.
Sincerely,
Peter Garcia