Giving
An overview of Churchteams Giving, including designations/funds, methods of giving, online & text giving, contribution statements, and other financial reports.
OVERVIEW
GIVING SETTINGS
To edit your Giving Settings, go to Giving > Settings to find the following options. Review and edit the Designations/Funds, Contribution Methods, and Online Giving (if using Churchteams for integrated online giving and registration payments) to set up the framework for collecting and tracking all of your contributions.

DESIGNATIONS/FUNDS
Customize the default funds to fit your language and goals. Use the ![]() button to create additional designations or funds. To edit an existing fund name and/or the settings for a particular fund, click the name of the fund, make the appropriate edits, and save.
button to create additional designations or funds. To edit an existing fund name and/or the settings for a particular fund, click the name of the fund, make the appropriate edits, and save.

- Click the name of a Fund to edit the Sort Order of where the Fund appears in the list, the Keyword associated with the Fund, and the Tax Deductible status of the Fund.
- Toggle by clicking Yes/No to make the Fund available for Online Giving or not.
- Toggle by clicking Yes/No to make the Fund the Default Designation for Online Giving.
- You can remove a Fund by clicking the Trash icon for the Fund. When you attempt to remove a Fund, you will get a system prompt asking you to reassign any contributions previously assigned to that particular Fund.
- Click the Campaigns button to expand the view to show or add Pledge Campaigns linked to a particular Fund. Click the Campaign name to edit the Goal, Date Range, and other settings.
- Click "+Add Campaign" to add a new Pledge Campaign to a Fund. You can have more than one Campaign linked to a Fund. Read more about setting up Pledges here.
- Click the "Create" button to link a Pledge Registration to the Campaign, giving you a digital commitment card.
CONTRIBUTION METHODS
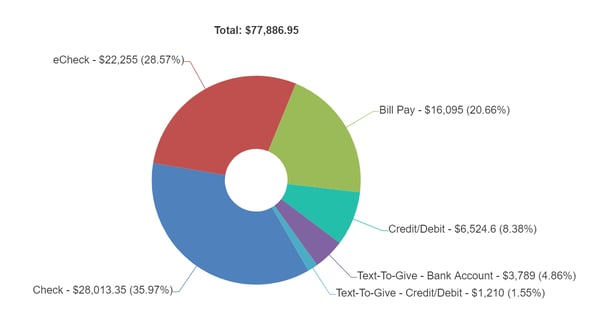
Go to Giving > Settings > Contribution Methods to add more giving methods if needed. Accurately using Contribution Methods allows you to accurately track the percentages of income from each of your giving sources. This is an important tool for stewardship development. Use Reports > New > Contribution Summary Chart (under the Financial section), to create a chart like this. You can then save this report and add it to your Metrics card on your Home screen.

ONLINE GIVING
Giving > Settings > Online Giving
Here you will find more information about our online giving system and once set up, you will find the links you need to put on your website, social media, and other outlets for people to give.
If you use external online giving services, those can be imported from a .csv file by going to Giving > Settings > Import Transaction File. Our online giving typically saves 15-20% on fees and posts directly to the donor's giving record. It is also integrated in our registration feature putting everything you need in one place. Our team will run a cost comparison analysis for you, just request that by emailing Support@Churchteams.com
 The Online Giving Options button at the bottom of the Online Giving page (only if Online Giving is set up/active) lets you customize the giving form (including logo), and create or edit the confirmation email. You can also sign up for Text-to-Church from this page.
OTHER OPTIONS
Giving > Settings > Other Options
This page allows you to customize or edit:
- Alternate search field, usually envelope number, for cash and check data entry.
- Contributor notes field: A person attribute (if populated) pops up as a reminder during check and cash data entry when a contribution for a person with information in that field is being entered.
- Administrative Assistant options to allow access to enter contribution data and/or reports.
- Email address to notify if any changes are made to contributions outside of data entry.
- Options for Giving Statement Salutations and Reply to Email.
- Default Giving Statement email. Use the advanced editor to customize and edit your Giving Statement email.
BATCHES - CASH & CHECK ENTRY
Online giving is automatically posted to donor giving records, but cash and checks must be manually entered either by personal data entry or by using a check scanner, depending on the number of checks you have.
Personal data entry has been streamlined so that after a month or so, data entry personnel can input at least 2 checks per minute, which is about 120 per hour. Check scanners require initial setup, but are helpful if you regularly enter a large number of checks.
Once entered, view old batches under Giving > Batch History. If you need to make a correction, click on the date of the batch, then search for the person to make a change to their donation and click Save. Summary, detail, and deposit reports for a specific batch can be accessed from here as well.
STATEMENTS
Watch for the Giving Statements briefing webinar we do each January to walk through all the statement options in detail. The Giving Webinar includes a section on statements.
The recommended process for running statements involves 3 steps, covered in detail in our Sending Statements Tutorial.
- Send Notification Email: a notice to contributors that you are preparing the annual contribution statements and would like them to review and update their household information as needed. Include the Member Update Link in your email so they can easily edit their records with one click.
- Default Settings for Statements: Go to Giving > Settings > Other Options to update your default statement settings and prepare the cover email that will be attached to your statements. More details on this can be found here.
- Reports > New > Contribution Statements (under the Financial section)- This is the report that produces your annual contribution statements. Options such as email v. printed, family v. individual statements can be edited in the Options column on the left. Filters for choosing whom to produce a statement for are edited in the middle Filters column. (Ex: Choose Members filter > Contributions to filter to contributors who gave in the prior year)

If you select Emailed Statements in the Options column, please note that running the Report will immediately generate and send out your statements. You can preview an emailed statement by simply filtering to send the statement only to yourself (People filter > Select Specific People, enter your name) before running the whole batch.
OTHER REPORTS
 When you select a report type (above), you will be prompted for other relevant information options. Select from these and run the report.
For giving behavior reports like first-time givers, lapsed givers, and people who gave a certain amount or a certain number of times; it is often better to choose a People Listing report (Reports > New > People Listing) and then use the filters to find the people you are looking for. You can send an email after running and viewing a Listing report.

FAVORITES & METRIC CARDS
Once you have created reports you use regularly, be sure to add them to Saved Reports. You can even customize date ranges for dynamic calculations like "X" number of weeks or Year-to-Date.
All saved reports are available for quick access using the gear icon on the Dashboard's Favorites card. Put your most-used reports here.
Saved Summary Charts are available for instant viewing when you log in and add them to the Metric card. You can save financial charts at the staff or other levels of access so that pastors and staff always have the information they need as soon as they log in.

RESOURCES
