
Parents will use the same 10-digit text number you already use for text-to-give, text-to-register, and text-to-attend. (See Settings / Contributions / Online Giving to set up a Text-to-Church account.)
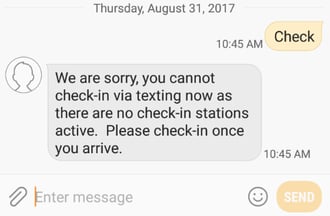
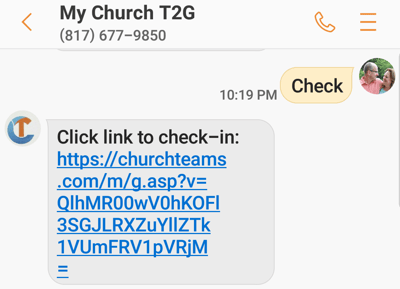
When parents text CHECK, they will get back a link:
If you have more than one active printer station, after clicking the link, the person checking in will choose which printer station or location they are using to check in. (Be sure to name printer stations so that the locations are easily recognizable, such as Building or Room #.) If there is only one printer station, it will be used automatically without a prompt.
First-time use for regular attendees. If a person has already used Text-to-Give or Text-to-Register, they will be in the system and taken to their family page for check-in. If not, the software uses their phone number to locate them in the database and prompts them to confirm their identity.
Family Check-in page. Once regular attendees click the link to check in, they will be taken to their family check-in page. Check the box for the class each person is checking into and click the green Check-in button. A pop-up box will appear confirming that check-in is complete and the attendee can click close to complete the process. A Parent Security code will be texted back if Family Labels (Option C1 in Check-in > Views / Settings) is enabled.

First-time guests not in the database. We recommend you set up a group for guests to register, such as creating a Guest Information group or using whatever group you already have set up to take in guest information. In the Check-in settings of the View you are using for Text-to-Check-in, go to section D, select "Registration Based" check-in, and select the guest group. This prompts the information form to first pop up for anyone not already in your database.