
The "Install App" button will appear as an option for anyone who accesses the Member Activity page (via an Invite from Staff, the Giving portal, or a Volunteer invite for example) and has not yet installed the new Member App. Here is a helpful video for members wanting to install the app.
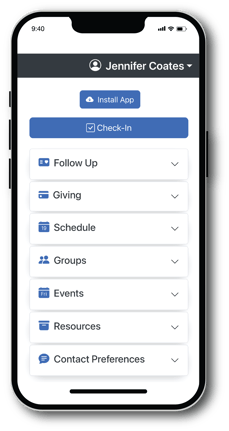
The Member App has eight other sections: Check-in (only visible when a Check-In session is open), Follow-up (only for those who have a Follow-Up assigned to them), Giving, Volunteer Schedule, Groups, Events, Resources, and Contact Preferences. Of these, only Giving, Schedule, and Contact Preferences are permanently listed. The rest are conditional on general settings and individual access or involvement.
- Check-in automatically shows up when check-in is running.
- Follow-up becomes available when someone has an active task assigned through the Notes feature.
- Events
There are two ways for an event to be included in the Events section of the Member App.- An Event link will be automatically included if the Event Start Date (found on the Registration Settings page) is in the future and the registration dates are currently open. This is so that an event will automatically be added to the App when registration starts and removed when registration closes.
- Choose to create a link to a Landing Page or other web page that describes the event in more detail and gives an opportunity to register. Copy the web address for the page. Then go to Communicate > Text > Settings and click the button to +Add a Link. You will be able to add a Text-to-Church keyword and opt to include this page in the Event section of the Member App.

If you choose to use a landing or web page for the event in the App, be sure to leave the registration start date blank in the registration settings for the event so that it doesn't show up in the App by default. Adding a registration end date, however, will still close registration if people access it on the landing or web page.
- Groups
Leaders can access their groups from the Member App, where they can complete meeting/attendance reports and access volunteer schedules. Optionally, if set up within each individual group, members of groups will be able to see the groups that they are in (but not the roster for the group). To enable this option, for current groups, go to the group and click Edit > Group information. Check the option as indicated in the image below.

- Resources
Resources can be a link to anything (live stream, message archives, website, Bible, etc.). They correspond to the Links section for Text-to-Church, where a keyword can be assigned. If there's a link you want to add to this section of the Member App, copy the link. Go to Communicate > Text > Settings and click the button to +Add a Link. Then, select the option to include it in the Resources section.

- Directory
The directory will be included in the Resources section of the Member App based on the settings you selected under Settings > Accessibility, under the Directory/Member Access section. If this is disabled, there will be no directory. All other settings for the directory, like "Church Member Type," will be honored. For example, if you've set it so that only regular attenders and members have access, guests and any other church member types will not have access.
To access the App, check out this quick Installation Guide Video.